It started with “free tool for splitting a scan with multiple photos” on r/software
The post went up on r/software under the title “free tool for splitting a scan with multiple photos into separate files”. The situation is a common one. Someone digitising an old family album lays three or four prints on a flatbed scanner at a time, and what comes out is one big image with several photos on it. What is needed is to cut that one image into a separate file per photo — and, ideally, to straighten the prints that went down at an angle.
It is not that nothing exists. The software that comes with some scanners has a multi-photo split built in, but it is tied to that scanner and that computer. Phone scanning apps are mostly built to flatten one document at a time and tend to want an account. There are web tools that split photos automatically, but they are often English-only, or they work by uploading your pictures to a server — and for anyone uneasy about sending family photographs to someone else's machine, that is where it stops.
Croppad fills the middle. It opens in a browser, has no account and no payment screen, and the scan is processed on this device and nowhere else. What it does not do is equally plain: it does not drive the scanner, and it does not bring back faded colour or remove scratches. It cuts out each photo exactly as the scanner saw it.
What Croppad does
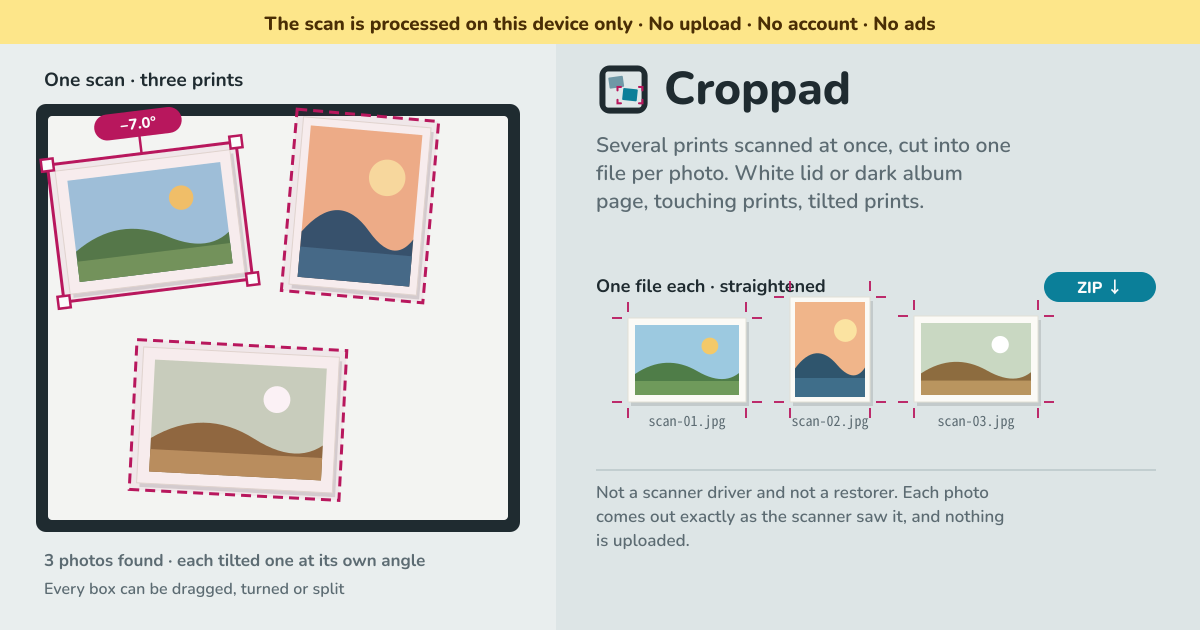
When a scan is dropped in, Croppad first reads the edges of the sheet. The edges are usually the scanner lid, so their colour is the background. That is why it finds photos on a white lid as well as on a black album page or a dark cloth laid behind the prints. Then it draws a box around every region that is not background, tilted to match the print if the print went down at an angle. Each box has its own angle.
Two cases are harder. One is a print with a white border on a white lid — the border melts into the background. Croppad follows the faint edge line and shadow a print casts to find its outline. The other is prints that touch. It looks for the thin seam between them and pulls them apart, and how hard it pulls is set with the Pull apart slider.
Every box can be fixed by hand. Drag it to move it, pull a corner to resize it, turn it with the round handle or the Angle slider, and nudge it with the arrow keys (ten pixels at a time with Shift). A photo that was missed gets Add a box; a box that is not wanted gets Delete box. When it is right, save: Save for one photo, ZIP this sheet for every photo on the scan in front of you, ZIP every sheet for the whole tray. Files are named after the scan with a number — scan-01.jpg, scan-02.jpg.
Your first scan, step by step
A little care at the scanner saves most of the box fixing afterwards.
- Lay the prints about a finger's width apart. Touching prints are pulled apart too, but a gap leaves nothing to get wrong. Leave a little margin at the edges of the glass as well.
- Scan the whole glass as one image, the way you normally would, and save it as JPEG or PNG. 300 dpi is plenty for most prints; scan at 600 dpi if you mean to enlarge small ones. A phone photo taken from above a table of prints works too.
- Drop that file into Croppad, or pick it with Choose scans; on a phone, Photograph a sheet takes the picture there and then. If you have scanned several times, drop them all at once — they line up in the tray, each with boxes of its own.
- Look over the boxes. If two photos share one box, raise Pull apart; if a pale print or its border was missed, raise Sensitivity; then press Find photos again. If that does not do it, fix the box by hand. If the background was misread — an album page mostly covered by prints, say — set Lid from Read from the edge to Light lid or Dark page.
- Turn a sideways photo upright with Turn 90°. Which way is up is something only a person looking at the picture can know.
- Choose how to save: JPEG with a quality slider or PNG, then Straighten each photo, Trim a white print border and Shave every edge. Turn Trim a white print border off if you want to keep the border.
- Save photos one at a time, or take them together with ZIP this sheet or ZIP every sheet. Once they are downloaded, Clear the tray empties it.
What it does not do, said plainly
- It is not a scanner driver. It does not switch a scanner on or start a scan. Scan the way you always do and bring the resulting file.
- It restores nothing. No bringing back faded colour, no removing scratches or dust, no sharpening and no colour correction. Each photo comes out exactly as the scanner saw it — only cut out and straightened.
- It does not split overlapping prints automatically. When one print lies over another, no automatic cut can reliably tell where one ends. Press Split in two and fit the halves by hand, or rescan with a gap — that is usually quicker.
- It does not read faces or what is in the pictures. All it looks for is where the background stops and a print begins; who is in a photo is none of Croppad's business.
- It is not an archive. The tray is where scans wait until you download them, not a photo library. What you keep is the files you download.
What stays on the device
The scans, the boxes and the settings all sit in this browser on this device. Finding, cutting and straightening the photos happens on this device too. There is no upload, no processing on a server and no account. Close the page and open it again and the tray is still there; it stays until you clear it.
So the thing to look after is the downloaded files. The tray is only a workbench: Clear the tray empties it, and clearing the browser's data clears it too. The original scans are still wherever the scanner saved them, so once the cut-out photos are downloaded and moved into the album folder, the job is done.
Is there an account or a paid tier?
No. There is no sign-up screen, no payment screen and no free trial. Opening the address is the whole of it.
Where does my scan get uploaded?
Nowhere. The file is opened on this device, finding, cutting and straightening all happen on this device, and the results are downloaded straight to it. There is no server to process anything, so there is nothing to send. Once it has been opened, it works the same with the internet switched off — which is the easiest way to check.
My prints have white borders and the lid is white — will it find them?
Usually, yes. The edge of a print leaves a faint line and a shadow under the scanner's light, and Croppad follows that line to find the outline. If a box hugs the picture and misses the border, raise Sensitivity and press Find photos again, or drag a corner out. The surest fix is a sheet of black paper or cloth behind the prints — Croppad works just the same on a dark background.
What if the prints overlap?
Touching prints are pulled apart, but overlapping ones are not split automatically. Where the corner of one print covers another, the hidden part is simply not in the scan, and there is no automatic way to decide reliably where to cut. Handing that to a person seemed more honest than confidently cutting in the wrong place. Press Split in two and pull each half onto its print, or move the prints apart and scan again.
Does it fix faded colours or scratches?
No. Croppad cuts printed photos out of a scan on this device. It is not a scanner driver and it does not restore, sharpen or colour-correct anything: each photo comes out exactly as the scanner saw it, and nothing is uploaded. If you want to work on the colour, open the downloaded files in the photo editor you already use — starting from a file that is as close to the original as possible is better for that too.
What happens if I turn Straighten each photo off?
A tilted photo is not turned; instead the upright rectangle round the print is cut out just as it lies, lid corners included. Most of the time straightening looks better. Either way a JPEG is compressed again when it is saved, so choose PNG if you want no compression loss at all. If a straightened photo shows a thin sliver of lid along its edge, raise Shave every edge (2 px by default).
Which files can I drop in? My scanner saved a PDF
JPEG, PNG and WebP work everywhere, and so does most any image the browser can open — on Safari that includes HEIC and TIFF. A PDF opens only if its pages are JPEG images, which is what scanners write; each page then goes into the tray on its own, named like “file p2”. Any other PDF is refused with a message asking you to save the scan as JPEG or PNG from the scanner instead.
What about a very large scan on an iPhone?
An A4 page at 600 dpi is over thirty megapixels, but Croppad never draws the whole page into one picture. It finds the photos on a small copy, 1000 px on the long edge, and then cuts each photo straight from the original, one at a time — so a 600 dpi A4 scan opens on a phone too. Only if a single photo is larger than the browser can hold in one canvas (about 16 megapixels) is that photo saved smaller, and a message says so.
Can I do a whole album in one go?
Yes. Drop many scans at once and they line up in the tray, each with its own boxes. Click through them to check the boxes, then press ZIP every sheet at the end, and the photos arrive together, named after their scan with a number. The tray stays until you press Clear the tray, so you can close the page halfway and carry on later.
Does it work offline, and in Korean, Japanese and German?
Once it has been opened, it works with no internet at all. “Install” or “Add to Home Screen” puts it on a computer or a phone as an icon. The interface is in Korean, English, Japanese and German, switched at the top right.